目录
- 前言
- 一、项目依赖
- 二、数据源配置
- 三、数据源的注册
- 四、配置数据源对应的sqlSessionFactory
- 五、测试接口
- 六、建立JtaTestContoller.java
- 七、在test.ftl中增加一个按钮来测试
- 八、启动服务,验证结果
前言
首先,到底啥是分布式事务呢,比如我们在执行一个业务逻辑的时候有两步分别操作A数据源和B数据源,当我们在A数据源执行数据更改后,在B数据源执行时出现运行时异常,那么我们必须要让B数据源的操作回滚,并回滚对A数据源的操作;这种情况在支付业务时常常出现;比如买票业务在最后支付失败,那之前的操作必须全部回滚,如果之前的操作分布在多个数据源中,那么这就是典型的分布式事务回滚;
了解了什么是分布式事务,那分布式事务在java的解决方案就是JTA(即Java Transaction API);springboot官方提供了 Atomikos or Bitronix的解决思路;
其实,大多数情况下很多公司是使用消息队列的方式实现分布式事务。
本篇文章重点讲解springboot环境下,整合 Atomikos +mysql+mybatis+tomcat/jetty;
一、项目依赖
pom.xml中添加atomikos的springboot相关依赖:
点进去会发现里面整合好了:transactions-jms、transactions-jta、transactions-jdbc、javax.transaction-api
二、数据源配置
把数据源的相关配置项单独提炼到一个application.yml中:
注意:
- 这回我们的
spring.datasource.type 是com.alibaba.druid.pool.xa.DruidXADataSource;
-
spring.jta.transaction-manager-id的值在你的电脑中是唯一的,这个详细请阅读官方文档;

完整的yml文件如下:
三、数据源的注册
在DruidConfig.java中实现多个数据源的注册;分布式事务管理器的注册;druid的注册
package com.zjt.config;
import com.alibaba.druid.filter.stat.StatFilter;
import com.alibaba.druid.support.http.StatViewServlet;
import com.alibaba.druid.support.http.WebStatFilter;
import com.alibaba.druid.wall.WallConfig;
import com.alibaba.druid.wall.WallFilter;
import com.atomikos.icatch.jta.UserTransactionImp;
import com.atomikos.icatch.jta.UserTransactionManager;
import org.springframework.beans.factory.annotation.Autowired;
import org.springframework.boot.jta.atomikos.AtomikosDataSourceBean;
import org.springframework.boot.web.servlet.FilterRegistrationBean;
import org.springframework.boot.web.servlet.ServletRegistrationBean;
import org.springframework.context.annotation.Bean;
import org.springframework.context.annotation.Configuration;
import org.springframework.context.annotation.Primary;
import org.springframework.core.env.Environment;
import org.springframework.transaction.jta.JtaTransactionManager;
import javax.sql.DataSource;
import javax.transaction.UserTransaction;
import java.util.Properties;
@Configuration
public class DruidConfig {
@Bean(name = "systemDataSource")
@Primary
@Autowired
public DataSource systemDataSource(Environment env){
AtomikosDataSourceBean ds = new AtomikosDataSourceBean();
Properties prop = build(env, "spring.datasource.druid.systemDB.");
ds.setXaDataSourceClassName("com.alibaba.druid.pool.xa.DruidXADataSource");
ds.setUniqueResourceName("systemDB");
ds.setPoolSize(5);
ds.setXaProperties(prop);
return ds;
}
@Autowired
@Bean(name = "businessDataSource")
public AtomikosDataSourceBean businessDataSource(Environment env){
AtomikosDataSourceBean ds = new AtomikosDataSourceBean();
Properties prop = build(env, "spring.datasource.druid.businessDB.");
ds.setXaDataSourceClassName("com.alibaba.druid.pool.xa.DruidXADataSource");
ds.setUniqueResourceName("businessDB");
ds.setPoolSize(5);
ds.setXaProperties(prop);
return ds;
}
@Bean(name = "xatx")
public JtaTransactionManager regTransactionManager (){
UserTransactionManager userTransactionManager = new UserTransactionManager();
UserTransaction userTransaction = new UserTransactionImp();
return new JtaTransactionManager(userTransaction, userTransactionManager);
}
private Properties build(Environment env, String prefix){
Properties prop = new Properties();
prop.put("url", env.getProperty(prefix + "url"));
prop.put("username", env.getProperty(prefix + "username"));
prop.put("password", env.getProperty(prefix + "password"));
prop.put("driverClassName", env.getProperty(prefix + "driverClassName", ""));
prop.put("initialSize", env.getProperty(prefix + "initialSize", Integer.class));
prop.put("maxActive", env.getProperty(prefix + "maxActive", Integer.class));
prop.put("minIdle", env.getProperty(prefix + "minIdle", Integer.class));
prop.put("maxWait", env.getProperty(prefix + "maxWait", Integer.class));
prop.put("poolPreparedStatements", env.getProperty(prefix + "poolPreparedStatements", Boolean.class));
prop.put("maxPoolPreparedStatementPerConnectionSize",
env.getProperty(prefix + "maxPoolPreparedStatementPerConnectionSize", Integer.class));
prop.put("maxPoolPreparedStatementPerConnectionSize",
env.getProperty(prefix + "maxPoolPreparedStatementPerConnectionSize", Integer.class));
prop.put("validationQuery", env.getProperty(prefix + "validationQuery"));
prop.put("validationQueryTimeout", env.getProperty(prefix + "validationQueryTimeout", Integer.class));
prop.put("testOnBorrow", env.getProperty(prefix + "testOnBorrow", Boolean.class));
prop.put("testOnReturn", env.getProperty(prefix + "testOnReturn", Boolean.class));
prop.put("testWhileIdle", env.getProperty(prefix + "testWhileIdle", Boolean.class));
prop.put("timeBetweenEvictionRunsMillis",
env.getProperty(prefix + "timeBetweenEvictionRunsMillis", Integer.class));
prop.put("minEvictableIdleTimeMillis", env.getProperty(prefix + "minEvictableIdleTimeMillis", Integer.class));
prop.put("filters", env.getProperty(prefix + "filters"));
return prop;
}
@Bean
public ServletRegistrationBean druidServlet(){
ServletRegistrationBean servletRegistrationBean = new ServletRegistrationBean(new StatViewServlet(), "/druid/*");
return servletRegistrationBean;
}
@Bean
public FilterRegistrationBean filterRegistrationBean(){
FilterRegistrationBean filterRegistrationBean = new FilterRegistrationBean();
filterRegistrationBean.setFilter(new WebStatFilter());
filterRegistrationBean.addUrlPatterns("/*");
filterRegistrationBean.addInitParameter("exclusions", "*.js,*.gif,*.jpg,*.png,*.css,*.ico,/druid/*");
filterRegistrationBean.addInitParameter("profileEnable", "true");
return filterRegistrationBean;
}
@Bean
public StatFilter statFilter(){
StatFilter statFilter = new StatFilter();
statFilter.setLogSlowSql(true);
statFilter.setMergeSql(true);
statFilter.setSlowSqlMillis(1000);
return statFilter;
}
@Bean
public WallFilter wallFilter(){
WallFilter wallFilter = new WallFilter();
WallConfig config = new WallConfig();
config.setMultiStatementAllow(true);
wallFilter.setConfig(config);
return wallFilter;
}
}
四、配置数据源对应的sqlSessionFactory
分别配置每个数据源对应的sqlSessionFactory,以及MapperScan扫描的包
MybatisDatasourceConfig.java
MybatisDatasource2Config.java
由于我们本例中只使用一个事务管理器:xatx,故就不在使用TxAdviceInterceptor.java和TxAdvice2Interceptor.java中配置的事务管理器了;有需求的童鞋可以自己配置其他的事务管理器;(见DruidConfig.java中查看)
五、测试接口
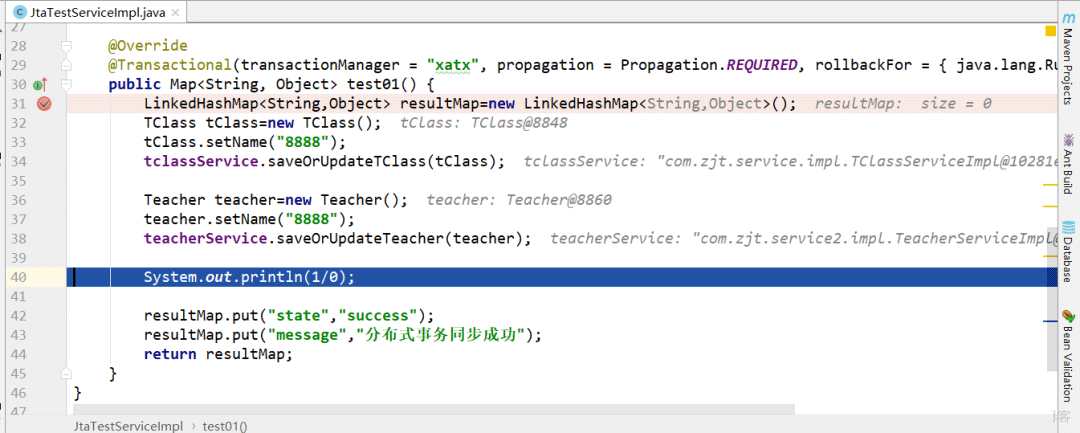
新建分布式业务测试接口JtaTestService.java和实现类JtaTestServiceImpl.java
其实就是一个很简单的test01()方法,在该方法中我们分别先后调用classService.saveOrUpdateTClass(tClass);和teacherService.saveOrUpdateTeacher(teacher);
实现先后操作两个数据源:然后我们可以自己debug跟踪事务的提交时机,此外,也可以在在两个方法全执行结束之后,手动制造一个运行时异常,来检查分布式事务是否全部回滚;
注意:
在实现类的方法中我使用的是:
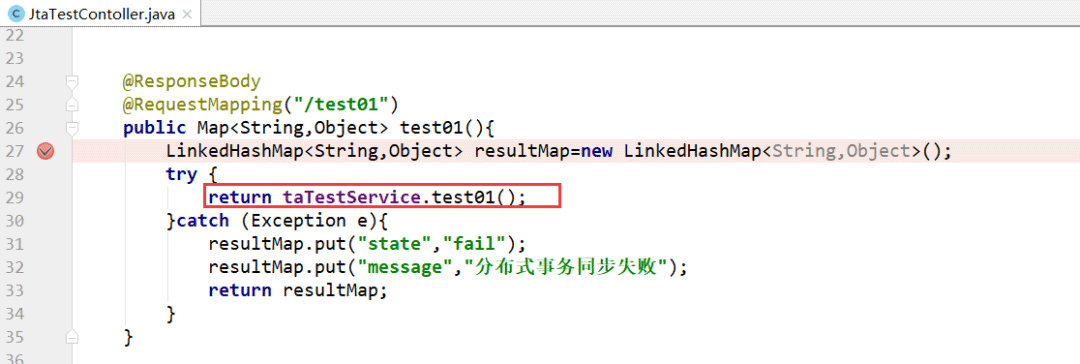
六、建立JtaTestContoller.java
建立JtaTestContoller.java,接受一个来自前端的http请求,触发JtaTestService 的test01方法
七、在test.ftl中增加一个按钮来测试
八、启动服务,验证结果
点击这个按钮,跳转到controller:
当正常执行了sql语句之后,我们可以发现数据库并没有变化,因为整个方法的事务还没有走完,当我们走到1/0这步时:
抛出运行时异常,并被spring事务拦截器拦截,并捕获异常:
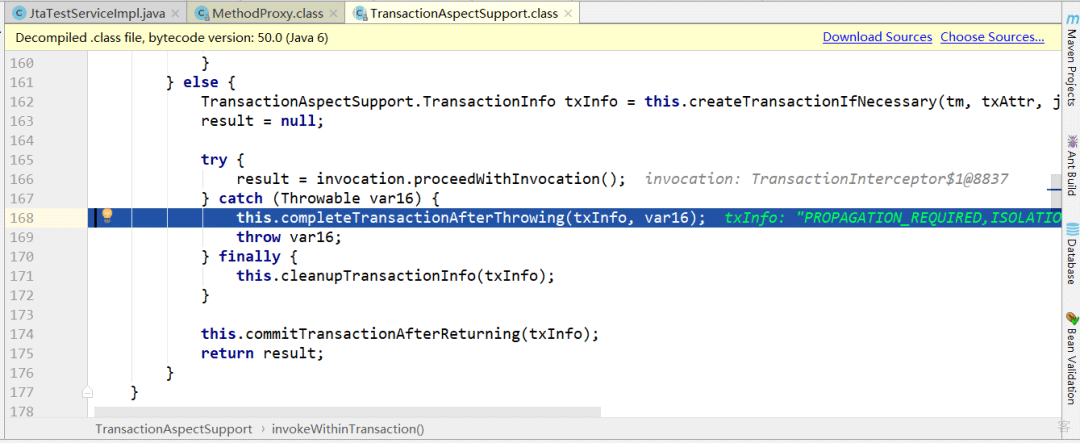
在this.completeTransactionAfterThrowing(txInfo, var16);方法中会将事务全部回滚:
22:09:04.243 logback [http-nio-8080-exec-5] INFO c.a.i.imp.CompositeTransactionImp - rollback() done of transaction 192.168.1.103.tm0000400006
此时,当我们再次打开数据库验证,依旧没有变化,证明分布式事务配置成功;
大家可以基于我的代码自己练习一下,自己尝试着使用多事务管理器的情况下的灵活配置;
到此这篇关于java SpringBoot 分布式事务的解决方案(JTA+Atomic+多数据源)的文章就介绍到这了,更多相关java SpringBoot 分布式事务 内容请搜索我们以前的文章或继续浏览下面的相关文章希望大家以后多多支持我们!